In the same vein as the rest of my posts in the Container Networking series, I want to learn how Calico sets up pod routes between Kubernetes nodes.
If you log into a Kubernetes node using Calico and run ip route you’ll see something similar to:
default via 10.208.197.1 dev ens3 proto dhcp src 10.208.197.10 metric 100
10.208.197.0/24 dev ens3 proto kernel scope link src 10.208.197.10
10.208.197.1 dev ens3 proto dhcp scope link src 10.208.197.10 metric 100
198.19.0.0/20 dev ens3 proto kernel scope link src 198.19.0.1
blackhole 198.19.21.0/26 proto bird
198.19.21.49 dev cali1b6540bf07c scope link
198.19.21.50 dev cali875a707efce scope link
198.19.21.51 dev cali3535068989c scope link
198.19.21.52 dev caliec67fa676df scope link
198.19.21.53 dev cali4e1e24bb189 scope link
198.19.21.54 dev cali85064d7ad0d scope link
198.19.21.64/26 via 198.19.0.3 dev ens3 proto bird
198.19.22.128/26 via 198.19.0.2 dev ens3 proto bird
198.19.28.208/29 via 198.19.0.2 dev ens3 proto bird
A few things stand out to me:
- What is
proto birdabout on some of these entries? - What is
blackhole? - Why is there a route for each virtual ethernet (veth) interface created by Calico matching the respective pod IPs?
While figuring this all out, we’ll also get a small taste of BGP.
Just like the previous posts, we won’t use containers or pods. We’ll create network namespaces and virtual ethernet devices manually.
I recommend reading How do Kubernetes and Docker create IP Addresses?! or having a basic understanding of how to create network namespaces and virtual ethernet devices before continuing.
Note: I’m running on Ubuntu 21.10, but any operating system supporting multipass should work for following along.
Create VMs with multipass
This time we’re trying to understand how multiple nodes work together for networking in Kubernetes. We’ll use Linux virtual machines (VMs) to demonstrate this.
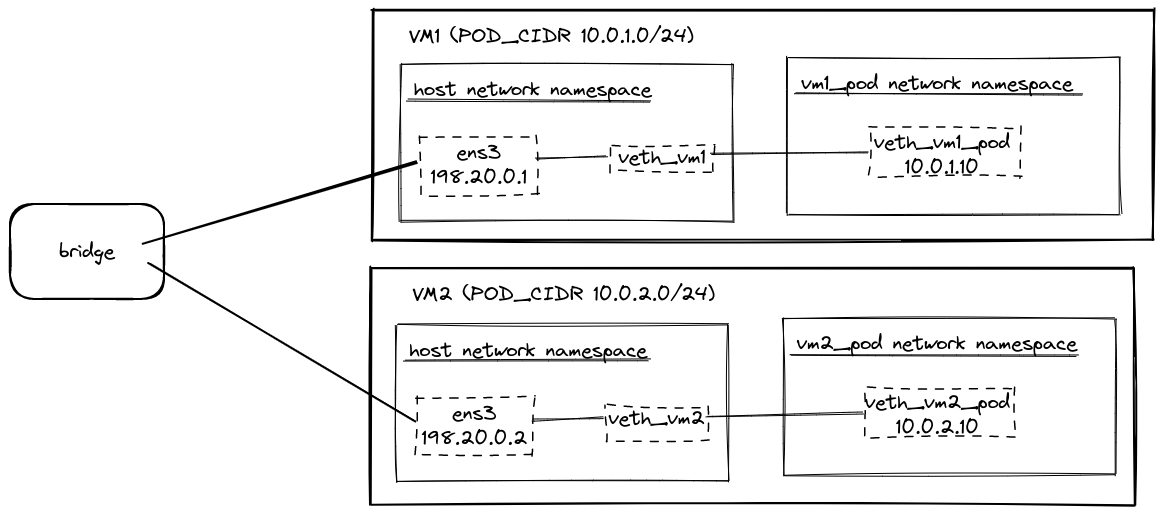
Here’s a diagram of what we’ll build before learning about BIRD and BGP.
We’ll use multipass to create two VMs running Ubuntu 20.04. Download and install multipass.
Then create a file named ~/vm1-cloud-init.yaml with the following content:
|
|
Launch the VM by running:
|
|
This command will create a VM named vm1 running Ubuntu 20.04 with 2GB of RAM. The cloud-init configuration will configure an IP address
of 198.20.0.1 on the ens3 interface.
Create another file named ~/vm2-cloud-init.yaml with the following content:
|
|
Launch a second VM by running:
|
|
This command creates another VM named vm2, similar to the first one, but with the IP address 198.20.0.2 instead.
Create virtual network interfaces
Just like in How do Kubernetes and Docker create IP Addresses?!, we’ll create virtual ethernet interfaces and network namespaces to act as our containers/pods in this case.
The main difference is we won’t create a bridge for the virtual ethernet devices to attach to, similar to how Calico works.
As shown in the above diagram, we’ll treat vm1 as having a pod CIDR of 10.0.1.0/24, and vm2 will use 10.0.2.0/24.
Open a shell on vm1 by running:
|
|
and then run the following commands to create a network namespace and virtual ethernet pair:
|
|
If you’d like more information on what these commands are doing, check out How do Kubernetes and Docker create IP Addresses?!.
You can then exit out of the shell by running exit.
Let’s verify the network interfaces are configured correctly by successfully running:
|
|
We’ll then create a network namespace and virtual ethernet pair on vm2. Open a shell by running:
|
|
and run the following commands:
|
|
To verify vm2 is configured properly, exit the shell and run:
|
|
To summarize, we created a network namespace on each VM (vm1_pod and vm2_pod) with IP addresses
(10.0.1.10 and 10.0.2.10) routing via the virtual ethernet interfaces (veth_vm1 and veth_vm2).
Recall that we did not create a virtual bridge to attach the ends of the virtual ethernets in the root network namespace. If we try to make a request to an IP address on the internet from our network namespaces, it will fail. We can see this by running:
|
|
This failure surprised me, but we can learn some more information by running tcpdump.
Open a terminal and run the below command to start tcpdump listening on the veth_vm1_pod interface in the vm1_pod network
namespace.
|
|
We won’t see any output right away. Now open another terminal and run the following command:
|
|
tcpdump supports an ICMP filter (the protocol ping uses), but it doesn’t display information about ARP requests. Instead,
we use traceroute to use the TCP protocol.
We’ll then see output from tcpdump about ARP requests without any response.
11:42:02.321070 ARP, Request who-has 8.8.8.8 tell 10.0.1.10, length 28
11:42:03.328090 ARP, Request who-has 8.8.8.8 tell 10.0.1.10, length 28
11:42:04.352034 ARP, Request who-has 8.8.8.8 tell 10.0.1.10, length 28
11:42:05.376102 ARP, Request who-has 8.8.8.8 tell 10.0.1.10, length 28
11:42:06.400083 ARP, Request who-has 8.8.8.8 tell 10.0.1.10, length 28
Enable ARP proxy for virtual network interfaces
Since we no longer have a virtual bridge set up, we’ll need something to handle ARP requests. Fortunately, there’s an option to enable proxying ARP requests.
To enable proxying ARP requests for virtual ethernet devices, run:
|
|
We can then validate this is successful by trying to ping 8.8.8.8 again:
|
|
and our traceroute commands will succeed too:
|
|
Add host levels routes manually
Now that our network namespaces can communicate with the internet, let’s configure routes to direct traffic for the other VM’s pod.
If we try to request from one VM to the other’s pod, it’ll fail. We can verify this by running:
|
|
We can add host level routes to fix this issue by running:
|
|
These commands instruct each VM about what to do with traffic for a pod found in the other VM’s pod CIDR.
We can now verify that each VM can communicate with the other’s pod by running:
|
|
Host level routing works perfectly fine for our use case, but we want to learn how to use BGP and BIRD to set up this routing automatically.
Let’s start by deleting these two routes for the pod CIDRs we just created:
|
|
and let’s learn how to use BIRD and BGP to do this alternatively.
Install bird2
Before we can start using BIRD, we’ll need to install bird2 on each VM. Be sure to
install the bird2 package and not the bird package. Their configuration files have different syntax, and
we’re using bird2 in this post.
|
|
These commands will install the bird2 package and set up a systemd service named bird. The bird2 package also installs
an executable named birdc that we’ll use shortly to examine our BIRD configuration.
Setup VMs as peers via BIRD
Now that we have BIRD installed on both VMs let’s configure the VMs to be aware of each other as BGP peers.
Start a shell on vm1 by running:
|
|
and then modify /etc/bird/bird.conf to be:
log syslog all;

router id 198.20.0.1;

protocol device {
}

protocol direct {
  ipv4;
}

protocol kernel {
  ipv4 {
    export all;
  };
}

protocol static {
  ipv4;
}

protocol bgp vm2 {
  local 198.20.0.1 as 65000;
  neighbor 198.20.0.2 as 65000;

  ipv4 {
    import all;
    export all;
  };
}
We’ll do something similar on vm2. Open a shell by running:
|
|
and modifying /etc/bird/bird.conf to be:
log syslog all;

router id 198.20.0.2;

protocol device {
}

protocol direct {
  ipv4;
}

protocol kernel {
  ipv4 {
    export all;
  };
}

protocol static {
  ipv4;
}

protocol bgp vm1 {
  local 198.20.0.2 as 65000;
  neighbor 198.20.0.1 as 65000;

  ipv4 {
    import all;
    export all;
  };
}
bird.conf explained
Let’s talk about what’s going on in these configuration files.
router id 198.20.0.1;
The router ID is an ID that should be unique to all peers. Typically, it’s the IPV4 address.
protocol device {
}
The device protocol instructs BIRD to examine the network devices such as ens3. Without this protocol, BIRD would be
unable to find the associated routes with ens3, such as 198.20.0.0/24.
protocol direct {
  ipv4;
}
The direct protocol handles routes created by the kernel, such as 10.208.197.0/24 and 198.20.0.0/24. We import these so
BIRD will know how to reach the static routes that we’ll specify in a bit. Otherwise, our other routes are unreachable.
Note: feel free to explore this later and set
disabled;on the direct protocol. This protocol took me a while to figure out why BIRD couldn’t reach routes we’ll export soon.
protocol kernel {
  ipv4 {
    export all;
  };
}
The kernel protocol is responsible for updating our host’s routes with what exists in BIRD. export all means write all
routes to our routing table.
protocol static {
  ipv4;
}
The static protocol contains hardcoded routes we want BIRD to broadcast and import into the routing table. We’ll use this in the next section when we want to broadcast pod CIDRs.
protocol bgp vm2 {
  local 198.20.0.1 as 65000;
  neighbor 198.20.0.2 as 65000;

  ipv4 {
    import all;
    export all;
  };
}
The bgp protocol is how we define a BGP peer. In this case, vm1’s bird.conf has a peer configured for vm2. Local doesn’t
need to specify an IP Address as an identifier, but it’s a convention. The as ##### should be unique per peer group. The
number doesn’t matter much in our case; other than 65000 exists within the reserved for private use range. More
info about ASN can be read at inetdaemon.
Start peering
We’ll then need to restart the bird systemd service on both VMs to pick up the configuration changes.
Run the following commands to restart bird:
|
|
Afteward, we can use birdc to validate that both VMs have established a connection to the other as a BGP peer by running:
|
|
The output from vm2 will look similar to:
vm1        BGP        ---        up     22:26:48.933  Established
  BGP state:          Established
    Neighbor address: 198.20.0.1
    Neighbor AS:      65000
    Local AS:         65000
    Neighbor ID:      198.20.0.1
    Local capabilities
      Multiprotocol
        AF announced: ipv4
      Route refresh
      Graceful restart
      4-octet AS numbers
      Enhanced refresh
      Long-lived graceful restart
    Neighbor capabilities
      Multiprotocol
        AF announced: ipv4
      Route refresh
      Graceful restart
      4-octet AS numbers
      Enhanced refresh
      Long-lived graceful restart
    Session:          internal multihop AS4
    Source address:   198.20.0.2
    Hold timer:       208.291/240
    Keepalive timer:  65.597/80
  Channel ipv4
    State:          UP
    Table:          master4
    Preference:     100
    Input filter:   ACCEPT
    Output filter:  ACCEPT
    Routes:         2 imported, 2 exported, 0 preferred
    Route change stats:     received   rejected   filtered    ignored   accepted
      Import updates:              2          0          0          0          2
      Import withdraws:            0          0        ---          0          0
      Export updates:              2          0          0        ---          2
      Export withdraws:            0        ---        ---        ---          0
    BGP Next hop:   198.20.0.2
    IGP IPv4 table: master4
We see that the BGP state is established. The Routes and Route change stats table let us know we’re currently receiving a
couple of routes.
We can also run:
|
|
and we’ll see the following output:
BIRD 2.0.7 ready.
Table master4:
198.20.0.0/24        unicast [direct1 22:26:44.803] * (240)
        dev ens3
                     unicast [vm2 22:26:49.017] (100) [i]
        via 198.20.0.2 on ens3
10.208.197.0/24      unicast [direct1 22:26:44.803] * (240)
        dev ens3
                     unicast [vm2 22:26:49.017] (100) [i]
        via 198.20.0.2 on ens3
BIRD 2.0.7 ready.
Table master4:
198.20.0.0/24        unicast [direct1 22:26:37.463] * (240)
        dev ens3
                     unicast [vm1 22:26:48.934] (100) [i]
        via 198.20.0.1 on ens3
10.208.197.0/24      unicast [direct1 22:26:37.463] * (240)
        dev ens3
                     unicast [vm1 22:26:48.934] (100) [i]
        via 198.20.0.1 on ens3
to see we’re currently sharing routes associated with the ens3 interfaces on our VMs.
Let’s modify our bird configuration, so we start receiving pod CIDR routes.
Advertise Pod CIDRs via BGP
Open another shell for vm1 with multipass shell vm1 and modify /etc/bird/bird.conf’s static section.
# ...

protocol static {
  ipv4;
  route 10.0.1.0/24 blackhole;
 }

# ...
We’ll do the same thing for vm2. Open a shell with multipass shell vm2 and modify /etc/bird/bird.conf’s static section.
# ...

protocol static {
  ipv4;
  route 10.0.2.0/24 blackhole;
}

# ...
The 10.0.1.0/24 blackhole and 10.0.2.0/24 blackhole have a few purposes. This part causes the
pod CIDR routes to be broadcasted between peers. It also has another slight advantage for the respective VM responsible for the
pod CIDR. On vm1, if we were to ping or curl 10.0.2.11 it would fail immediately, instead of timing out. Not a huge thing,
but slightly nicer than a timeout.
Restart the bird service on each VM again to pick up the config changes:
|
|
We can view the Route state changes again by running:
|
|
and we’ll see output similar to:
vm1        BGP        ---        up     22:18:03.833  Established
  BGP state:          Established
    Neighbor address: 198.20.0.1
    Neighbor AS:      65000
    Local AS:         65000
    Neighbor ID:      198.20.0.1
    Local capabilities
      Multiprotocol
        AF announced: ipv4
      Route refresh
      Graceful restart
      4-octet AS numbers
      Enhanced refresh
      Long-lived graceful restart
    Neighbor capabilities
      Multiprotocol
        AF announced: ipv4
      Route refresh
      Graceful restart
      4-octet AS numbers
      Enhanced refresh
      Long-lived graceful restart
    Session:          internal multihop AS4
    Source address:   198.20.0.2
    Hold timer:       184.660/240
    Keepalive timer:  8.370/80
  Channel ipv4
    State:          UP
    Table:          master4
    Preference:     100
    Input filter:   ACCEPT
    Output filter:  ACCEPT
    Routes:         3 imported, 3 exported, 1 preferred
    Route change stats:     received   rejected   filtered    ignored   accepted
      Import updates:              3          0          0          0          3
      Import withdraws:            0          0        ---          0          0
      Export updates:              4          1          0        ---          3
      Export withdraws:            0        ---        ---        ---          0
    BGP Next hop:   198.20.0.2
    IGP IPv4 table: master4
and notice that the Routes and Route change stats show 3 imported routes.
We can then display the known routes by running:
|
|
to see the following:
BIRD 2.0.7 ready.
Table master4:
198.20.0.0/24        unicast [direct1 22:17:59.303] * (240)
        dev ens3
                     unicast [vm2 22:18:03.901] (100) [i]
        via 198.20.0.2 on ens3
10.208.197.0/24      unicast [direct1 22:17:59.303] * (240)
        dev ens3
                     unicast [vm2 22:18:03.901] (100) [i]
        via 198.20.0.2 on ens3
10.0.1.0/24          blackhole [static1 22:17:59.303] * (200)
10.0.2.0/24          unicast [vm2 22:18:03.901] * (100) [i]
        via 198.20.0.2 on ens3
BIRD 2.0.7 ready.
Table master4:
198.20.0.0/24        unicast [direct1 22:16:39.058] * (240)
        dev ens3
                     unicast [vm1 22:18:03.833] (100) [i]
        via 198.20.0.1 on ens3
10.208.197.0/24      unicast [direct1 22:16:39.058] * (240)
        dev ens3
                     unicast [vm1 22:18:03.833] (100) [i]
        via 198.20.0.1 on ens3
10.0.1.0/24          unicast [vm1 22:18:03.833] * (100) [i]
        via 198.20.0.1 on ens3
10.0.2.0/24          blackhole [static1 22:16:39.056] * (200)
We can also see BIRD has updated the host level routes by running:
|
|
to see routes (on vm2) including:
...
10.0.1.0/24 via 198.20.0.1 dev ens3 proto bird metric 32
blackhole 10.0.2.0/24 proto bird metric 32
...
We can verify each VM can ping the interface in the other VM’s pod CIDR by running:
|
|
and finally, we can see the result of the blackhole route on each respective VM by running:
|
|
Notice how the curl commands fail immediately with curl: (7) Couldn't connect to server instead of waiting for
a timeout.
And that’s what I have to teach about BGP and BIRD for now.
To stop and delete these VMs entirely, run:
|
|
I hope you learned a bit about BIRD, BGP, and how Calico works; I know I did. This post is the tip of the iceberg regarding these technologies.
We haven’t had the chance to experience the benefit of BGP. In this use case, it’s overkill. BGP can be beneficial with IP in IP and vxlan (future topics for me to learn).
There’s a lot of information here, and I wouldn’t be surprised if I misunderstood something. Please feel free to reach out on [LinkedIn or GitHub, letting me know!
The last thing I want to do is be wrong on the internet.