One of the first mysteries I encountered with Docker and Kubernetes was seeing IP addresses created for containers and pods. And thinking how did these IP addresses enable binding a port number already used by another process? Turns out this is handled by Linux’s network namespaces and virtual interfaces.
This article started out as learning about IP address creation but evolved into learning:
- how to create network namespaces
- how to spawn a process in a network namespace
- how does a Docker container or Kubernetes pod have its own localhost
- how to create virtual interfaces
- how does communication between Docker containers and Kubernetes pods work
- how does a Docker container or Kubernetes pod communicate with the local network
- how does a Docker container or Kubernetes pod communicate with the internet
- how to use
iptablesto handle traffic between interfaces
Note: This post only works on Linux. I’m using Ubuntu 19.10, but this should work on other Linux distributions.
run a Python HTTP server
Our first goal is to run two instances of a Python HTTP server using the same port number and have
both accessible via curl on the command line.
Python has a built-in HTTP server that is quick to use. We can start a server by running:
|
|
This will start an HTTP server listening on port 8080. Keep this server running for the remainder
of this post. We can then make a request to this server by opening another terminal and running:
|
|
and you should see a response. Also, you should see the server log that it received a request. This will make it easier for us in a little bit to know which server responded when we have multiple servers going.
Open another terminal and run:
|
|
We’ll get an expected error stating:
OSError: [Errno 98] Address already in use
If you’ve worked on software that required a port to listen on, then you’ve probably seen a similar error message before. So how does Docker enable multiple containers to listen to the same port number without causing any errors like above?
create a network namespace
“Containers are just Linux cgroups and namespaces.”
Quotes like this show up all over the place when searching for what a container is. There’s a lot of truth to this quote and we need to start with the network namespace.
Earlier when we were running python3 -m http.server 8080 we were using the host network
namespace (sometimes called the root or global network namespace). We can create a new
network namespace to run a second HTTP server using port 8080.
The ip tool may be used to manage network namespaces
and we’ll use ip later to setup virtual devices and IP addresses. We can use ip to create a
new network namespace by running:
|
|
We can use this newly created network namespace to start an HTTP server by running:
|
|
This will execute our command (python3 -m http.server 8080) using the netns_dustin
network namespace instead of the host network namespace.
The server will start without any error messages - that’s progress! Also keep this HTTP server running for the remainder of this post. You should now have two HTTP servers running.
Open another terminal and run:
|
|
we’ll see that the first HTTP server responds. How do we make a request to our second HTTP server?
Let’s try curl against the second HTTP server by running:
|
|
and we’ll get the following error message:
curl: (7) Couldn't connect to server
Whoa, we can’t even communicate to localhost within our network namespace. This happens because
the loopback device in our netns_dustin network namespace isn’t up.
start the loopback device
Each network namespace has its own localhost and loopback (lo) device. So the localhost
in the netns_dustin network namespace is different than the localhost in the host network
namespace.
When we create a new network namespace, the loopback device for that network namespace is down. We can see this by running:
|
|
and we’ll see the following output:
1: lo: <LOOPBACK> mtu 65536 qdisc noop state DOWN group default qlen 1000
    link/loopback 00:00:00:00:00:00 brd 00:00:00:00:00:00
Notice the loopback (lo) device is down. We need to start the loopback device up by running:
|
|
Afterwards we can run:
|
|
to see the following output:
1: lo: <LOOPBACK,UP,LOWER_UP> mtu 65536 qdisc noqueue state UNKNOWN group default qlen 1000
    link/loopback 00:00:00:00:00:00 brd 00:00:00:00:00:00
    inet 127.0.0.1/8 scope host lo
       valid_lft forever preferred_lft forever
    inet6 ::1/128 scope host
       valid_lft forever preferred_lft forever
Now we can execute:
|
|
We’ll get a response AND the second HTTP server will log that it received a request.
Docker containers and Kubernetes pods have their own
localhostbecause network namespaces have their own loopback device.
As it stands we’re unable to make a request to this second HTTP server without being in the
netns_dustin namespace. This is where virtual ethernet devices come in.
create virtual ethernet devices
Linux has a number of
virtual device types
we can create. We’re interested in veth. veth are virtual ethernet devices and are
created in pairs.
These devices are typically used to connect network namespaces, such as our netns_dustin and host namespace.
It helps me to think of virtual ethernet devices as an ethernet cable connecting two computers
(network namespaces). This also helps to explain why creating a veth creates two virtual ethernet
interfaces as an ethernet cable has two ends.
First, we’ll need to create the veth pair by running:
|
|
This will create two virtual ethernet devices in the host network namespace. We can list
all links in the host network namespace by executing:
|
|
and we’ll see our virtual ethernet devices listed:
41: veth_ns_dustin@veth_dustin: <BROADCAST,MULTICAST,M-DOWN> mtu 1500 qdisc noop state DOWN mode DEFAULT group default qlen 1000
    link/ether d2:e8:b9:60:20:d4 brd ff:ff:ff:ff:ff:ff
42: veth_dustin@veth_ns_dustin: <BROADCAST,MULTICAST,M-DOWN> mtu 1500 qdisc noop state DOWN mode DEFAULT group default qlen 1000
    link/ether 5a:7b:4b:ca:80:41 brd ff:ff:ff:ff:ff:ff
Your mac addresses and indexes (41 and 42) will most likely be different, but the rest should
look the same. Take note that both of our devices are DOWN. We’ll keep the veth_dustin device
in the host network namespace, but we’ll soon move the veth_ns_dustin device to our
netns_dustin namespace.
Start up the veth_dustin device via:
|
|
We can also see its state has changed in the output of ip link list. veth_dustin is now UP.
We’ll move the veth_ns_dustin device to the netns_dustin network namespace by running:
|
|
If we run ip link list we’ll see that the veth_ns_dustin device is no longer displayed and we
also see more information on the veth_dustin device:
42: veth_dustin@if41: <NO-CARRIER,BROADCAST,MULTICAST,UP> mtu 1500 qdisc noqueue state LOWERLAYERDOWN mode DEFAULT group default qlen 1000
    link/ether 5a:7b:4b:ca:80:41 brd ff:ff:ff:ff:ff:ff link-netns netns_dustin
The bottom line informs us now that veth_dustin’s pair exists in the netns_dustin namespace.
We can verify this by running:
|
|
We’ll see the veth_ns_dustin device listed and it will be in the DOWN state. Let’s start up the
veth_ns_dustin device by running:
|
|
If we run sudo ip netns exec netns_dustin ip link list again we’ll see veth_ns_dustin’s state
is now UP.
create virtual IP addresses for our virtual ethernets
At this point we can assign IP addresses to our virtual ethernet devices by running:
|
|
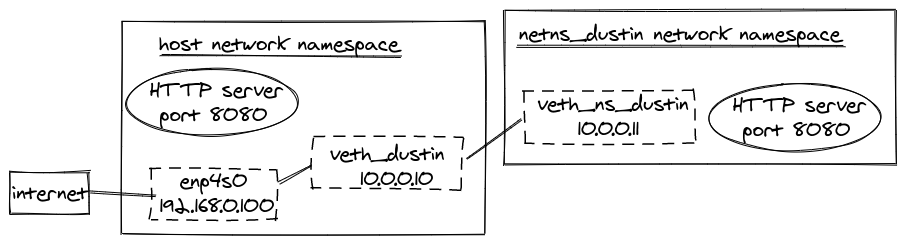
This will give veth_dustin an IP address of 10.0.0.10 and veth_ns_dustin 10.0.0.11.
Docker creates a container IP address by assigning an IP address to an interface. Kubernetes creates a pod IP address the same way.
We’ve done a lot. Here’s a diagram to help visualize our network so far:

At this point the four following commands will work:
|
|
But more importantly we can finally make a request to our second HTTP server from the host
network namespace when we run:
|
|
BOOM! Working perfectly. Now, let’s see what happens when we make a request to the first HTTP
server from our netns_dustin network namespace:
|
|
Another BOOM! That works perfectly too.
Last thing to try is making a request to our first HTTP
server via our computer’s local IP address instead of 10.0.0.10:8080. Find your local IP
address from ip address list or hostname --all-ip-addresses. We’ll use 192.168.0.100 as a
local IP, but please replace it with your own. If we run:
|
|
We’ll see this familiar error message:
curl: (7) Couldn't connect to server
So close. Now we need to enable our netns_dustin namespace to be able to make requests to the
192.168.0.100 address. The problem is our network namespace does not know how to route the
192.168.0.100 address. It only knows about the IP address of veth_dustin and its own.
Fortunately we can help our network namespace out by telling it how to route requests by running:
|
|
This tells our network within the netns_dustin namespace that if it can’t find a suitable route
for our request then direct the request to 10.0.0.10. So now we can successfully execute:
|
|
This works because our request goes to 10.0.0.10, which is in the host network namespace.
The host network namespace does have a route for 192.168.0.100, which we can see via
ip route list.
talk to the internet from our network namespace
It’s great that we have a process running in its own network namespace, but some processes need to communicate with the internet. So let’s try doing that:
|
|
which will print this error message:
ping: www.google.com: Temporary failure in name resolution
Note: depending on your
/etc/resolv.confthis ping might just be hanging instead.Ctrl+cand continue on.
Okay, so DNS resolution isn’t working. Let’s try requesting a public IP address directly:
|
|
So this isn’t working either. After some reading, it turns out we need to configure iptables.
We need to forward packets from our virtual ethernet device (veth_dustin) to a physical
device.
First, IP forwarding needs to be enabled. IP forwarding enables receiving traffic on our virtual
ethernet device and forwarding it to another device and vice versa. Check what the contents of
/proc/sys/net/ipv4/ip_forward are by:
|
|
If the output is 1, then you’re good to go because IP forwarding is enabled. If the output is
0, then we can temporally enable it by running:
|
|
Note: If temporally changed then IP forwarding will be disabled again upon reboot.
Second, we need to find the name of the physical device. Run:
|
|
Look through the list for a device that has your local IP address listed. For me, my physical
ethernet is named enp4s0.
To forward traffic from the virtual device to the physical device and vice versa execute:
|
|
Note: If interested in seeing rules in
iptables, I recommend runningsudo iptables-saveto get a nice list printed.
If we were to leave our iptables configured like this we would never get a response back. When
traffic is forwarded via the rules we’ve created the source IP address isn’t changed. So our
requests will be leaving with an IP address of 10.0.0.10 which a router on your network or the
internet isn’t going to be able to resolve. Bummer.
On the bright side, iptables has another rule that will change the IP address when leaving a
particular interface.
|
|
Be sure to change enp4s0 if your physical device has another name. So with this rule, whenever
a packet leaves through the enp4s0 interface the packet’s source IP will be updated to the IP
of the enp4s0 interface, which is our local IP address (192.168.0.100 in these examples).
The updated network diagram is now:
Let’s run ping again:
|
|
That’s looking good now. Let’s try pinging www.google.com again with:
|
|
Depending on your /etc/resolv.conf this request might work. For others, including me, this
will still fail with the previously seen error:
ping: www.google.com: Temporary failure in name resolution
To fix this, we’ll need to configure the network namespace’s resolv.conf.
configure a network namespace’s resolv.conf
By default, a new network namespace will use the /etc/resolv.conf as its own resolv.conf for
DNS resolution. My /etc/resolv.conf looks like:
nameserver 127.0.0.53
options edns0
search svc.cluster.local cluster.local
The important part here is the nameserver 127.0.0.53 line. Since each network namespace has its
own localhost then this won’t work as is. Fortunately we can configure a network namespace’s
resolv.conf. We’ll need to create a directory for our network namespace:
|
|
Then create a /etc/netns/netns_dustin/resolv.conf file with the following contents:
nameserver 8.8.8.8
8.8.8.8 is Google’s DNS. You’re welcome to choose a different preferred DNS. Afterwards, if we
once again run:
|
|
Then we’ll see a successful request. Perfect.
What more could we want from our network namespace? Well, sometimes we’ll want a process running in one network namespace to be able to talk to a different process running in another network namespace. So let’s figure that out.
communicate across multiple network namespaces
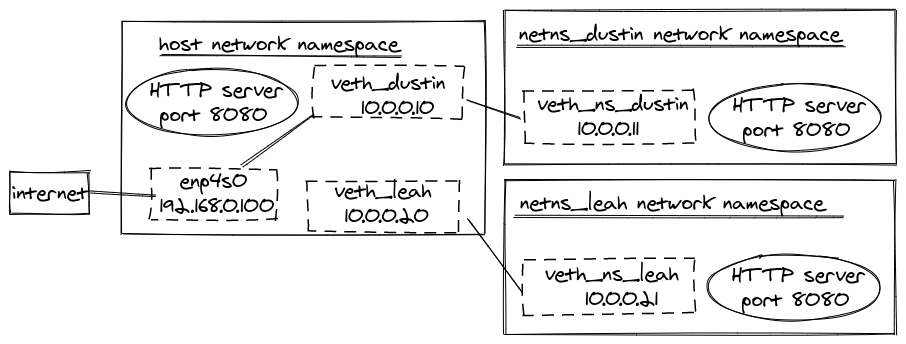
To create another network namespace and wire up a veth pair like we have done before, execute the following:
|
|
This will start a third HTTP server. This time in the netns_leah namespace.
With these new virtual ethernet devices and network namespace our network diagram now looks like:
Open another terminal. This command will work:
|
|
but the following will all fail:
|
|
This is because we have an issue in the host’s network route list now, which we can see by
running:
|
|
We’ll see the following entries:
10.0.0.0/24 dev veth_dustin proto kernel scope link src 10.0.0.10
10.0.0.0/24 dev veth_leah proto kernel scope link src 10.0.0.20
These entries are causing issues. IP routing will use the first 10.0.0.0/24 route for any
match meaning all 10.0.0.0/24 traffic will be directed through the veth_dustin interface.
Even though we sometimes want traffic to be directed through the veth_leah interface.
Instead of assigning IP addresses for the veth_leah and veth_ns_leah interfaces on
10.0.0.0/24, we could use 10.0.1.0/24.
This works, but is not great. It limits our usage of IP addresses. This strategy also requires
us to configure forwarding between the veth_leah and enp4s0 interface. We also need to configure
forwarding between each veth pair. We’d have to do this for every single veth pair we add going forward.
This becomes tedious quickly. We could do some fine tuning on the host’s routing as well, but it’s
all going to be a lot.
Linux virtual bridge devices solve these problems.
create a virtual bridge to join veth pairs
Linux has another virtual device type that will help us, bridge. The bridge type allows
multiple ethernet and virtual ethernet devices to communicate with one another. Let’s create a
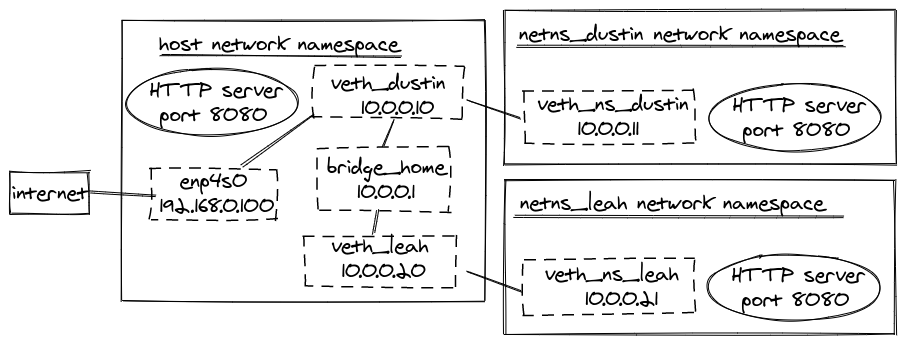
new bridge, assign an IP address to it, and bring it up:
|
|
If you run ip link list, you’ll see the newly created bridge_home. To connect a virtual
ethernet to a bridge, we assign the veth’s master to the bridge. Connect veth_dustin and
veth_leah to bridge_home by running:
|
|
With the virtual ethernet devices connected to the bridge, our network diagram looks like:
At this point, we can make the default routes in our network namespaces the same. Before,
each namespace directed traffic to the IP address of the veth_dustin or veth_leah interface,
but we can instead use the bridge_home IP address.
|
|
Right now, if we run ip route list we’re going to see three routes that match 10.0.0.0/24
(veth_dustin, veth_leah, and bridge_home). We need to fix this so that traffic can be
correctly routed between our interfaces. Thankfully, the easy solution is to delete the
IP addresses for veth_dustin and veth_leah. So let’s delete these IP addresses:
|
|
We don’t need these IP addresses anyways. Our network namespaces can always use the local IP
(192.168.0.100) to communicate with a process running in the host network namespace.
Now ip route list only shows bridge_home being a match for the 10.0.0.0/24 range. We
can successfully execute:
|
|
but running
sudo ip netns exec netns_dustin ping 10.0.0.21 -c 1
sudo ip netns exec netns_leah ping 10.0.0.11 -c 1
will both fail because our bridge isn’t enabled to forward traffic. Currently
bridge_home will receive traffic from veth_dustin and veth_leah, but all packets that
need to then be forwarded to veth_leah and veth_dustin, respectively, will be dropped by
bridge_home.
Enabling a bridge to forward traffic from one veth to another veth is a matter of running:
|
|
If you’re new to iptables, yes, you’re reading that right. We need an iptables rule to
instruct the bridge_home that it may forward traffic out of itself that it receives. This
took me a few evenings to discover this as the culprit as to why traffic wasn’t working between
namespaces. Anyways, we can now run:
sudo ip netns exec netns_dustin ping 10.0.0.21 -c 1
sudo ip netns exec netns_leah ping 10.0.0.11 -c 1
sudo ip netns exec netns_dustin curl 10.0.0.21:8080
sudo ip netns exec netns_leah curl 10.0.0.11:8080
We have communication between our namespaces working!
We can clean up our old iptables rules for forwarding traffic between veth_dustin and
enp4s0 by running:
|
|
And now we need to add rules to forward traffic between bridge_home and enp4s0.
|
|
This forwarding enables any connected veth to the bridge_home to have internet access because
the bridge_home device and enp4s0 are able to forward traffic between one another.
Our final network diagram looks like:
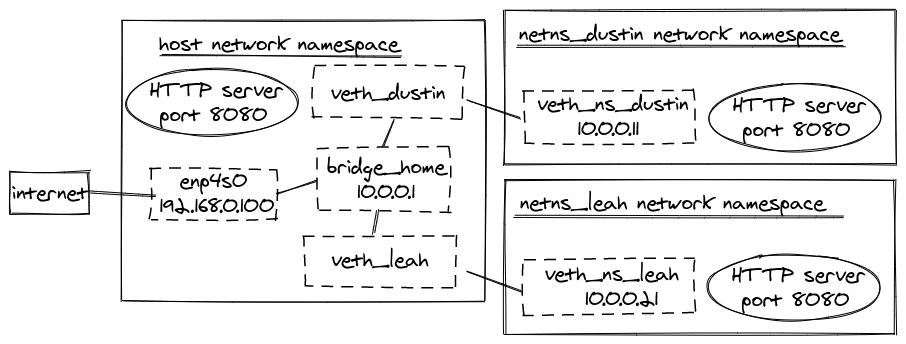
Bridges are awesome. This now enables any future veth pairs to simply set master of the veth
in the host network namespace to bridge_home and the network namespace will have access
to the other network namespaces and the internet! Each network namespace just needs to configure
the default route to go through our bridge (10.0.0.1) and configure its resolv.conf.
When running
docker network create, Docker will create a new bridge. When a container is set to run with a specific network Docker attaches a veth to the network’s bridge, connecting the container to the Docker network.
clean up
We can clean up what we’ve created by running:
|
|
Or if you’d prefer, you may simply reboot your computer and all of these will be gone.
remaining questions
Well, I sure learned a lot, but I still have some remaining questions to answer in the future.
- Why does Docker assign a MAC address to containers?
- How does Docker handle publishing ports? Update: I wrote a post on iptables: How Docker Publishes Ports
- How does Docker manage anonymous network namespaces (This is why we only see the namespaces we
created under
ip netns list.) - How does Kubernetes’ pod to pod communication work when a CNI doesn’t use bridges?
- What is Kubernetes’ use of IPVS about? Update: I dove into this on IPVS: How Kubernetes Services Direct Traffic to Pods
- How does Kubernetes forward traffic to pods on multiple nodes?
(I’m suspecting a route to a node based on the pod CIDR for that node from what I learned in
resolving kubernetes services from host when using kind)
- I talk about using BGP and BIRD to do this in Kubernetes Networking from Scratch: Using BGP and BIRD to Advertise Pod Routes.
I’m new to a lot of this, so if you see something glaringly wrong please feel free to reach out on LinkedIn or GitHub. Or drop a message if you know the answer to any of these remaining questions.