Ubuntu 20.04 released a tool named Autoinstallation. Autoinstallation is comparable to cloud-init that several cloud offerings support for configuring virtual machines (VM). Autoinstallation achieves a similar configuration for a no-cloud environment.
We can use VirtualBox to create a new VM that is automatically configured with our Autoinstallation configuration. Using a VM enables us to try out Autoinstallation configuration changes without impacting real hardware.
We’ll use Autoinstallation to:
- set server’s hostname
- set a static IP address for our server
- create a user that may only login via SSH
- install an SSH server
For this, I’ll be using the Ubuntu 20.04 live server ISO. Go ahead and download this ISO.
We’ll soon create another ISO with Autoinstallation configuration. We’ll end up mounting both of these ISOs in VirtualBox to create a VM.
Install required packages
We’ll need to install a couple of apt packages before we continue. Run:
|
|
cloud-image-utils 0.31.7 and virtualbox 6.1.16 were installed at the time of writing this.
cloud-image-utils will install a program named cloud-localds, which creates an ISO with autoinstall configuration. VirtualBox will be used to create VMs.
Create user-data file
Before we can create an ISO, we’ll need to write the Autoinstallation configuration. This config file is a YAML file looking similar to:
|
|
This configuration will:
- set the server’s hostname to
ubuntu-server - create a user named
dustin - prevent logging in as
dustinwith a password - add a public SSH key to later SSH in as
dustin - allow the
dustinuser to usesudo - set the server’s IP address to
192.168.0.137
The Autoinstallation documentation describes other available configuration options.
The user-data key allows us to use cloud-init configuration. I’m using this to prevent having to set a password for a default user. Within the user-data, we’re
creating the dustin user that may only login via SSH.
The network block is a little wonky and the duplicate network is intentional and required due to a bug. The network section matches the Netplan configuration.
I’m using match.name: en* to prevent having to know the ethernet interface name in advance. This network configuration will set a static IP address of 192.168.0.137 for the server.
Note: replace the ssh_authorized_keys content with the content of your public SSH key. This will enable logging in via SSH once the VM is created.
Create seed.iso
To create an ISO with autoinstall configuration, navigate to the directory where the user-data file exists and run:
|
|
This will create an ISO at ./seed.iso. It’s common to see this file named seed, but not a
requirement.
cloud-localds is focused on cloud-init but works for Autoinstallation too. cloud-localds creates
an ISO with a cidata volume, which is what autoinstall and cloud-init both look for.
Create virtual machine
Open VirtualBox and click “New” to create a new VM.
I named mine ubuntu and allocated 4GB of RAM. I left the defaults and clicked through the wizard.
Once the VM is created, click “Settings” on the new VM. Under “System -> Processor,” I provided 4 CPUs. This isn’t required but helps speed up the process.
Next, navigate to “Network -> Adapter 1”. Change “Attached to” from “NAT” to “Bridged Adapter” and leave the default values. This will make it easier to SSH into the VM later without having to configure any port forwarding.
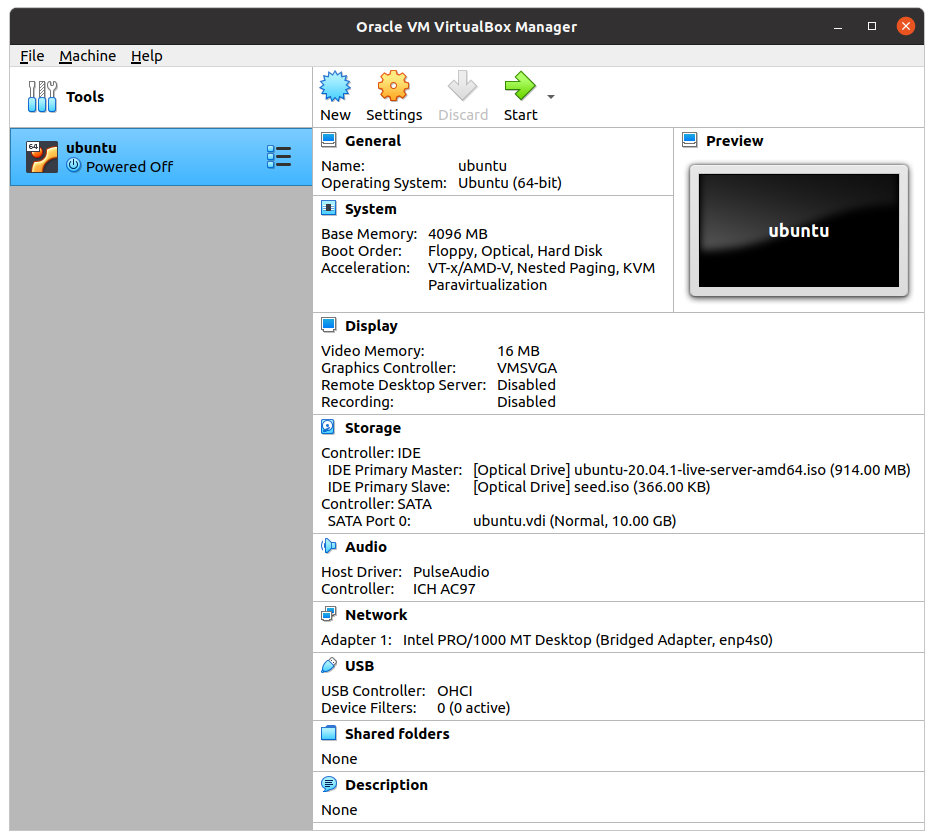
Finally, go to “Storage.” To the right of “Controller: IDE,” add an optical drive. Set the new optical drive to “IDE Primary Master” and select the Ubuntu 20.04 live-server ISO.
Add another optical drive. Set this drive to “IDE Primary Slave” and select the seed.iso file created earlier.
Click “Ok.”
The configuration should look like this:
Start virtual machine
Now, start the virtual machine that was created previously.
The virtual machine will boot and validate the Autoinstallation configuration. Soon a prompt stating:
Continue with autoinstall? (yes|no)
will appear. Type yes and hit enter.
Now wait until Ubuntu 20.04 is installed and the VM reboots.
We’ll then be able to run:
|
|
to login via SSH. Be sure to replace 192.168.0.137 with the IP address of your VM.
Success!
Autoinstallation is a great way to automate most of installing Ubuntu servers in a non-cloud environment.