The next question to answer after writing How do Kubernetes and Docker create IP Addresses?! is “How does Docker handle publishing ports?”
In the previous post, we created our own network namespaces, virtual interfaces,
and assigned IP addresses to these virtual interfaces. Now we’ll learn how to make a request to 127.0.0.1:8080 or
192.168.0.100:8080 (a local IP address) and forward the request to an HTTP server running in our network namespace. This will help us understand what Docker does
when the docker run command is instructed to publish ports.
Docker (version 19.03.6) uses a couple of techniques including a proxy that binds a port in the host network
namespace and makes requests to a container’s network namespace.
This post focuses on the other technique Docker uses, iptables, which can also be used to forward requests from a port in the host network namespace to an IP address and port residing in another network namespace.
Note: This post only works on Linux. I’m using Ubuntu 19.10, but this should work on other Linux distributions.
This post will assume you’re familiar with network namespaces and virtual interfaces. If not, I recommend going back and reading my previous post, How do Kubernetes and Docker create IP Addresses?!
create network namespaces and virtual devices
First, we’ll need to catch up to where How do Kubernetes and Docker create IP Addresses?! left off.
Let’s make sure IP forwarding is enabled by running:
|
|
Then execute the following bash commands:
|
|
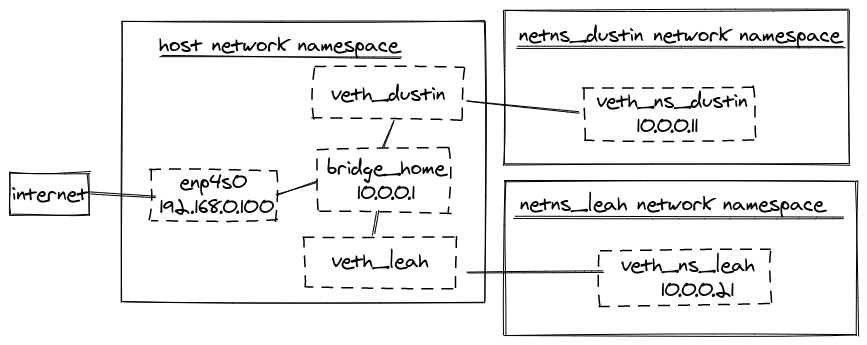
This will create two network namespaces (netns_dustin and netns_leah) connected to a virtual
bridge named bridge_home via veth pairs. 10.0.0.11 and 10.0.0.21 will be assigned to the
virtual ethernet in the netns_dustin and netns_leah network namespaces, respectively. Both
network namespaces will be able to communicate with the public internet by using 8.8.8.8 for
DNS.
For a visual aid, our setup now looks like this:
improve iptables commands from the previous post
In the previous post we ran the following commands (don’t run these now!):
|
|
These rules enabled traffic to travel across the bridge_home virtual bridge and enabled
our network namespaces to communicate with the public internet.
These rules can be simplified and improved by instead running (run these now!):
|
|
Now, what we’re saying is any traffic entering or leaving the bridge_home interface may be
accepted. And finally, we perform a masquerade on our traffic coming from the 10.0.0.0/24 range,
which covers our veth pairs connected to bridge_home.
Note: we’ll cover what
MASQUERADEmeans in a little bit.
This has an additional benefit of we don’t need to know the name of the physical interface. Also, this enables other physical interfaces to communicate with our network namespaces.
To validate the setup is working as intended, the following commands need to run successfully:
|
|
This will validate the host is able to communicate the network namespaces and that the two network namespaces may communicate with each other as well.
iptables tips
Throughout this post we’re going to be modifying iptables. A helpful command to view all iptables rules is:
|
|
This will print the iptables as-is. Great for seeing what’s going on! I recommend running sudo iptables-save
whenever we’re modifying iptables.
Note:
iptables-savewill show short argument names instead of long ones, so-Ainstead of--append.
In fact, this is a great way to make a back up of iptables. If we were to do:
|
|
we’d create a file named iptables.bak that we could restore our iptables from. To restore, run:
|
|
We can also restart the computer to get our old iptables back.
use iptables to perform a port forward
Now, on to the fun stuff. Let’s spin up a Python HTTP server in the netns_dustin network
namespace by running:
|
|
This will start an HTTP server running on port 8080.
Open another terminal and find your local IP address (ip address list). I’ll
use 192.168.0.100 as the local IP address in this post, but please remember to
replace it with your own.
If we then attempt to run:
|
|
we’ll get an expected error stating:
curl: (7) Failed to connect to 192.168.0.100 port 8080: Connection refused
We need to instruct iptables that when a request is made to port 8080 to direct that traffic to
10.0.0.11:8080 instead. We can do that by running:
|
|
This adds a rule to the nat table. The nat table is used for Network Address Translation. In
this case, we’re configuring a DNAT rule, which stands for Destination Network Address Translation.
This rule will match any packet using TCP destined for port 8080. At that point, it’ll set the
destination IP and port on the packet to 10.0.0.11:8080.
Note: Why
--match tcpand--protocol tcp?--protocol tcpspecifies the rule is for TCP, while--match tcploads more specification options related to TCP like--dport, which we use in the above rule.
Note: There’s also a
SNAT(Source Network Address Translation), which is similar toDNATbut instead modifies the source of a packet to an explicit IP address/port. This is whereMASQUERADEcomes in.MASQUERADEis likeSNAT, but does not require specifying an IP address in iptables. Updating the source of a packet is automatically handled when usingMASQUERADE. I think ofMASQUERADEas a dynamicSNAT.
Enough with the notes, now we can run:
|
|
Perfect! But now for some bad news. Try running:
|
|
and try running:
|
|
Both of these will “work” and get a response from our own HTTP server! This is undesirable, to say the
least. Fortunately, iptables supports many options for rules. In the iptables rule above,
we specified it needs to match on --dport (destination port) and TCP protocol. We can also
specify a match on the destination IP.
First delete the previously created iptables rule via:
|
|
and add a more specific rule:
|
|
Now making a request to 192.168.0.101:8080 and www.google.com:8080 both fail, while a request
to 192.1.0.100:8080 still works.
We can improve this rule even more. Unless 192.168.0.100 is a static IP, there’s a chance
our local IP address could change in the future. That would mean we’d have to constantly
update our iptables rule. Bleh!
iptables has another helpful feature we can use.
Once again, delete the previously created rule:
|
|
and add an improved rule via:
|
|
Instead of specifying a destination IP address we instead use --match addrtype --dst-type LOCAL
to match any local destination. If you’d like, you may verify the request still works via:
|
|
enable external traffic to be port forwarded
On a second device such as a phone or another computer on the same network, navigate to
192.168.0.100:8080 in a browser. This will fail.
The rule we created was for the OUTPUT chain in the nat table. The OUTPUT chain is used
for locally created packets. The nat table has another chain for packets entering the system
from an external source. This chain is named PREROUTING. Brent Salisbury has created a helpful GitHub Gist,
Linux NetFilter, IP Tables and Conntrack Diagrams,
as an overview of these different tables and chains.
To correctly route external traffic, we can define the exact same rule as above, but append
it to the PREROUTING chain instead of the OUTPUT chain. Do so by running:
|
|
Now on the second device, reload 192.168.0.100:8080 and we’ll get a response from our HTTP
server!
create a custom iptables chain
We now have two identical rules on separate chains (PREROUTING and OUTPUT) in the nat
table. We can create a custom chain to DRY
these rules.
To create a new chain in the nat table named DUSTIN, run:
|
|
We’ll then add our duplicated rule from above to the DUSTIN chain like so:
|
|
We’ll add another rule in the DUSTIN chain that will tell iptables to return to the rest of
the chain calling this chain if none of the other rules in DUSTIN are a match.
sudo iptables \
  --table nat \
  --append DUSTIN \
  --jump RETURN
Note: Technically our
RETURNrule is not needed. If iptables reaches the end of a custom chain then iptables will proceed with the following rules after the jump to the custom chain. Netfilter describes this in its Target Specifications documentation.
Let’s delete the old duplicated rules in the PREROUTING and OUTPUT chains by running:
|
|
Then we can add two rules to instruct the PREROUTING and OUTPUT chains to use the DUSTIN
chain whenever a LOCAL address type is used for the destination.
|
|
We could have associated the --match addrtype --dst-type LOCAL on the rule in the DUSTIN
chain and omitted it from these two rules. However, in a little bit, we’ll add another rule to
the DUSTIN chain and since the --match addrtype --dst-type LOCAL is at the calling chain
(PREROUTING or OUTPUT), we don’t have to remember to always add this to every rule in the
DUSTIN chain. This is what Docker does as well, so we’ll match them.
add another port forward in the custom chain
Let’s start another HTTP server in the netns_leah network namespace:
|
|
We’ll need to add another rule to the DUSTIN chain by running:
|
|
If we then make a request to port 8081 by running:
|
|
It’ll fail. Wait, fail?!
So rules in iptables are performed in order. If we look at the existing rules in the DUSTIN chain
via:
|
|
We’ll see the following output:
Chain DUSTIN (2 references)
target     prot opt source               destination
DNAT       tcp  --  anywhere             anywhere             tcp dpt:http-alt to:10.0.0.11:8080
RETURN     all  --  anywhere             anywhere
DNAT       tcp  --  anywhere             anywhere             tcp dpt:tproxy to:10.0.0.21:8081
So append is, well, appending to the end of the chain. We need to make sure the new rule is before
the jump to RETURN. We can use --insert instead of --append to specify where to place the rule.
First, delete the rule we just made:
|
|
and then insert the rule after our other port forwarding rule, but before the RETURN rule:
|
|
Now the following request will work:
|
|
docker-proxy and local network
So far we’ve been using the 192.168.0.100 IP address, but what happens if we try 127.0.0.1,
0.0.0.0, or localhost? The following will all fail:
|
|
By default, Linux will not consider our iptables rules for the local network. As mentioned in the intro,
Docker gets around this by running another process, docker-proxy, when running a container exposing ports.
This proxy has a few benefits:
- works for forwarding ports on the local network as this will not use iptables
- works when Docker is configured to not modify iptables
- binds the port on the host network to verify no other process is or could use the same port
We can do something similar using socat. On Ubuntu, socat may be installed via:
|
|
Once socat is installed we can then run:
|
|
This instructs socat to listen on port 8080 and forward requests to 10.0.0.11:8080.
Next, we’ll need to make sure a MASQUERADE is being performed on requests coming from the local network
into our bridge_home device. This can be configured by running:
|
|
At this point the following requests will work:
|
|
forward ports on the local network using iptables
I’m stubborn and don’t like admitting defeat to computers, so I want to understand how to use
iptables to forward a port on the local network. Be sure to terminate the socat process (CTRL+c
should do the trick).
We’ll need to enable the route_localnet option so that we can instruct Linux to properly direct
our port forwarding on the local network via iptables. Run:
|
|
After enabling routing on the local network and adding the MASQUERADE rule in the previous
section, the following requests will work:
|
|
and without a proxy!
some future research topics
Learning all of this stuff typically ends with me having more questions such as:
- Why does Docker not enable local network routing?
- Update (August 1st, 2020): Tabitha Sable wrote about a Kubernetes CVE where enabling routing on the local network is the culprit. So yeah, bad idea.
- How to better debug iptables? I’m familiar with using
TRACEandLOG, but please let me know if you have tools you like to use instead! - Not a question, but I want to learn more about
conntrack. Docker uses this.conntrackseems to “remember” the iptables rule result for a given source, so that not every packet from the same source has to traverse all of the iptables rules.
Did I explain something poorly or, worse, wrong? Know the answer to one of the above questions? Then please feel free to reach out and let me know on LinkedIn or GitHub.